
Things are not always what they seem. That man in the street muttering to himself may in fact be using the latest hands-free mobile phone. On the Go board, a corner territory you believe to be safe can suddenly be devastated by your opponent's invasion.
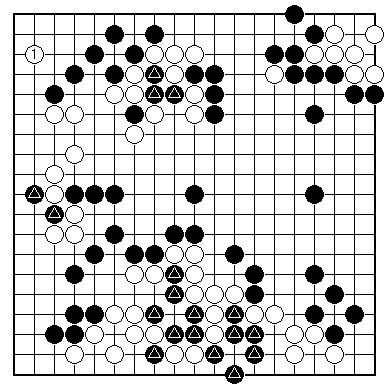
In the club tonight TODD is continuing his dogged search for Go mastery, undergoing a nine-stone teaching game from MIRIAM, a 2 kyu player. As we join them, Black is still ahead by more than 30 points (in the position shown Black can be counted with nearly 100 points, White with about 65 - the lower side accounts for most of White's score, all the marked black stones being dead).

White has just invaded the top left corner. This is a key point in the game. If White can live there Black will lose around 15 points and White will gain a few, making the margin small enough for White to catch up in the endgame, a couple of points at a time. Go isn't always the test of nerve that backgammon players enjoy in their game. But in this typical situation from handicap Go Black must tough it out. No way is White's invasion legitimate! Black must try to kill it, and do the maximum damage to White's territory immediately below, also. This is no time to wimp out. A passive attitude on Black's part makes White's task at high handicaps quite easy.
That being said, how does Black plan ahead?
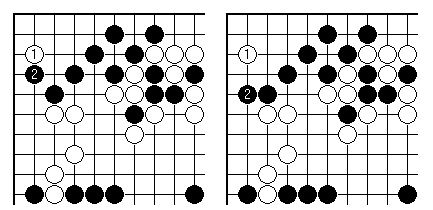
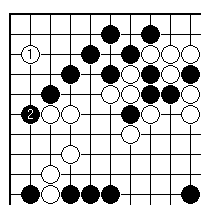
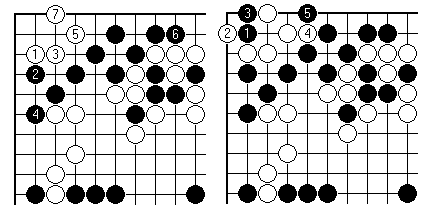
It is simple enough to cut the invading stone off from the outside. That anyway must be the first step. Black has several ways to do this. These three diagrams show different methods of preventing White's connection (at the point 2 in the top-right one). Their respective merits depend on (a) what happens next in the corner; but also on (b) what effect they have on White's territory outside. This makes a complete discussion quite dense.
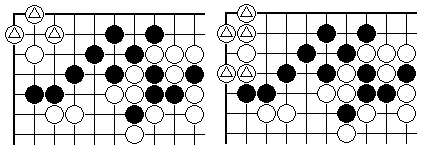
A shortcut that is of tremendous practical use is to visualise some possible ways in which White could live in the corner, before getting down to particular sequences.
In this case White could form two economical eyes with the three extra marked stones in the left-hand diagram. With five more, as in the right-hand diagram, White is also alive; but it is hard to see her having that much time.
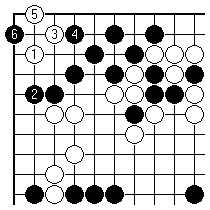
Now we can try a typical variation. Black 2 cuts White off, White 3 starts to build eye space. Black 4 is nothing fancy, but it leaves White one move short of safety, requiring both 2-1 points (Go players aren't fussy about the order or origin of co-ordinates). For example if White plays 5 as shown, Black plays 6 to create a one-eyed (therefore dead) group.
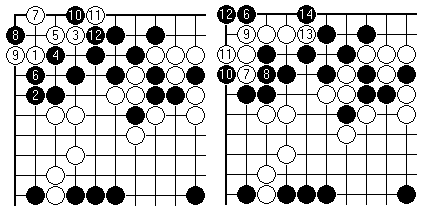
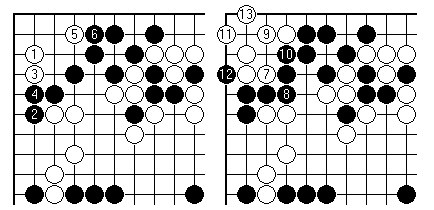
White will try to make Black work rather harder than that. White reaches one further with 3 - this gives Black a chance to make a mistake. This choice of Black 4 is not the best, it turns out. In the left-hand diagram Black gets back on track with 6, and White dies: capturing the one black stone played as 10 will yield White only a false eye. In the right-hand diagram Black recklessly plays at a key 2-1 point with 6 instead, giving White a surprising resource.
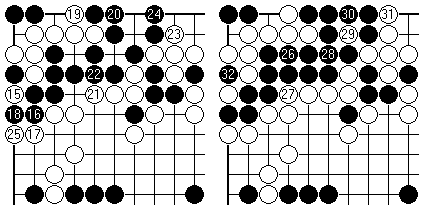
In White's dreams this sort of thing then happens, with the outside black group embroiled in an unfavourable ko fight with the invaders.
Black should see to his own eye shape first, before worrying that White may live easily in the confined space available.
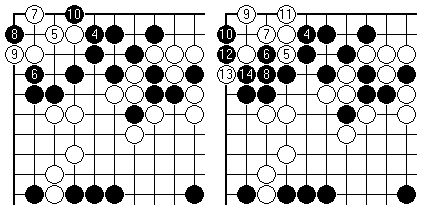
Therefore Black 4 here is a sound choice. Black has two eyes himself, and White only one, in all variations.
So it really seems that the simplest Black reply to the invasion is secure. It also threatens White's territory below, so that White's try may turn out to have a downside, too. In a real game Black would have done very well to have seen this far, and have found one satisfactory answer.
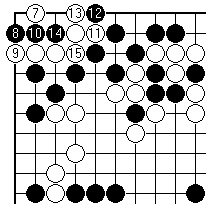
In the actual game it went this way. After White 7 the white corner can be killed (top right diagram); but Black didn't notice this. In fact White appears not to be able to live here. The left-hand diagram shows something else (this isn't a seki position, whatever some of you may think - White is dead once more). The only chance would be to reduce Black's eye shape, but Black 6 makes that unlikely.
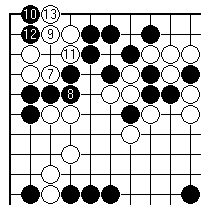
That leaves this other way to play. Is this any good? Pretty dangerous to allow White to play 3, for little gain. The problem is that White 7 threatens a cut, and also builds a potential eye. Now it seems that White will live in one of the ways shown.
Difficult stuff? To the dan player these conclusions should be routine, given enough thinking time. Anyone short of that level may make mistakes in this type of position in real games. But remember that Black would be satisfied with one simple, solid way to play, and in practice need not have fathomed all the possible variations.
First published 4 April 2000 as On Your Side on MindZine,
Go Learning
© Charles Matthews 2000.