
High hopes and low cunning only take one so far in learning Go. At certain points the business of what is actually going on has to be taken into account. Few, perhaps, are altogether ready for the orthodox wisdom, before the ground has been prepared by harsh experience.
Students of the game get used to the idea that there are overviews explaining matters in broad terms, and micro-nuggets that address what will often seem very tiny issues. A good teacher will administer advice as an appropriate balance of the two.
If you are an active Go player but not making much progress, you may either need some new principle to widen a bottleneck in your understanding, or some technical tips to salami-slice your main area of ignorance with a few incremental improvements. That is, the most helpful comments might apply more than 90% of the time, or less than 1% of the time. Anyone who is substantially stronger than you will be able to identify many mistakes in your game; and produce things they know about Go that you don't, falling in the 10% applicability range. While you may find these comments and ideas interesting, they may not fit easily with an unrevised version of what you already know.

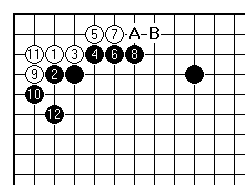
You have already met this 3-3 invasion sequence. But on the strength of looking over your shoulder during games, it would be worth my putting some points to you about what happens next on the top side. Should White continue with A or B, when it is time to play there?
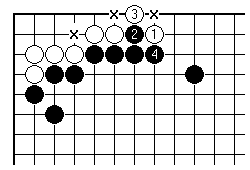
As I rather suspected, your first instinct is to jump out to B. This after all makes one line extra progress into Black's possible territory here. However this will be the wrong choice 90% of the time (it might be correct if it bridged under to other White stones). Black can play 2 and 4 at once to force a loss on White - the need to connect back later will require White plays at the points marked 'x'. It seems possible that you underestimate the penalties attached to leaving cutting points in your groups.
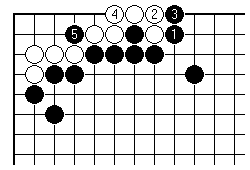
In fact there is an immediate tactical threat based on those cutting points. Black 1, 3 and 5 have an obvious effect.

Therefore White will finish off by adding 5 here (or else the whole sequence will have had less than no positive effect). White has gained little in territory. Has Black lost? Here we can bring in an appeal to some general principles:
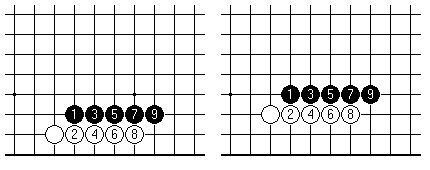
Here in abstract terms is an explanation of point (a). The judgement of strong players is that in general the exchange in the left-hand diagram here is favourable for Black: White loses points in crawling along the second line while Black builds a wall along the third line. The right-hand diagram shows an exchange traditionally considered even (though current professional thinking tends towards believing it is slightly better for Black). It anyway suggests that crawling along the second line loses a point per step.
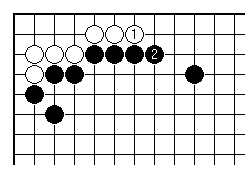
All that goes to make this the expected sequence round here. White 1 is better shape, and Black 2 is an adequate answer.
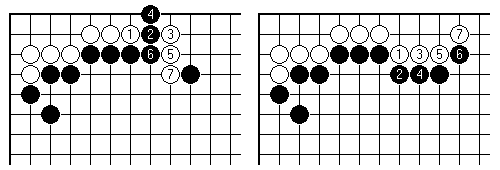
These are two variations Black avoids by the calm response in the previous diagram. The attempt on the left to block White directly leaves a cutting point; which White exploits by the clamp tactic 3, with potential complications. On the other hand simply ignoring White's play, as on the right, allows White to make a noticeable amount of territory.
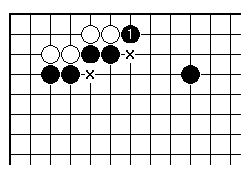
Reverting to the 3-3 invasion sequence, let's look at a variation. Black mistakenly plays 1 on the second line. If this particular lesson has sunk in, you ought be able to apply it, and see what is wrong with this play for yourself. It leaves two cutting points (marked 'x'), which is one more than the wise want packed close together. And the need to stop White crawling along isn't pressing - Black should be content to build central strength.
First published 27 April 2000 as On Your Side on MindZine,
Go Learning
© Charles Matthews 2000.