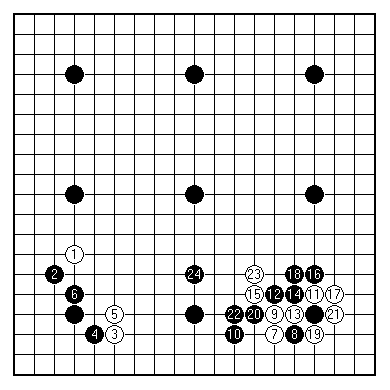
(1-24)

This evening the ever-hopeful TODD is challenging GOLD. He'll receive a nine-stone handicap, but this still looks like a mismatch.
How so? It is all very well to point to the gap in standard. GOLD can play at amateur 5 dan level almost without trying. But the nine-stone handicap is overwhelming. No doubt the stronger player can find more efficient moves. There is still the question of how these translate into a winning position, from a start at great disadvantage.

(1-24)
Here is the opening of the game. At this early stage we can point to inefficient plays by Black. Both 18 and 22 form what are called empty triangles. These are symptomatic of stones not best employed.
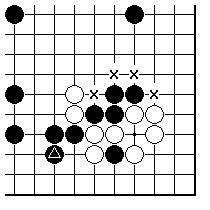
The usual explanations of the drawbacks of the empty triangles:
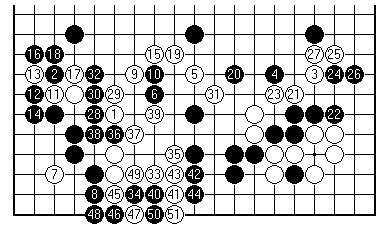
(1-51)
White goes into action to try to make full use of the two stranded stones (15 and 23 of the last diagram).
The procedure is first to work on gaps in Black's formations to left and right; then play at 5 to prevent Black's simple connection to the centre; and finally with 21 to try direct assault. Black does seem confused in his priorities. Playing 28, 30 and 32 to round up three white stones is a slow-moving plan, compared to White's grand attacking conception.
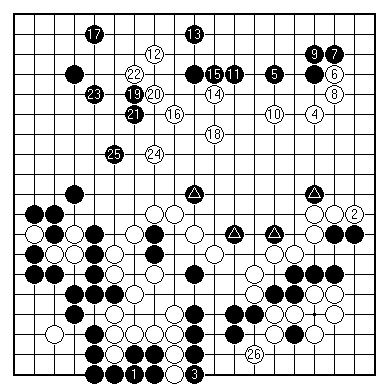
(1-26)
The next two dozen plays proved decisive. White rounded up the whole of the right side, including a number of black stragglers (marked). All the while Black had a good chance of making the lower side group live. White had bigger fish to fry, but when Black defended the left at 25, White returned to kill the lower side with 26.
A count of the game then shows White comfortably ahead. Let's score it roughly to see how it was done: White right side and centre 70, lower right corner (including dead stones) 40. Black left side 75, top right 25.
GOLD was accurate in his counting: killing Black with 26 was just the icing on the cake. (NB the usual idea of counting dead stones in place in territories, that is, counting one for the stone and one for the point beneath it.)
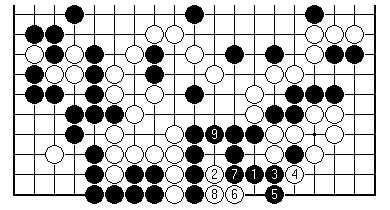
Let's just eavesdrop on the post-game analysis.
Here's the sequence by which Black could live. White 2 is on the key point for eye shape, but Black 3 and 5 mean White must also play at 6 to prevent two eyes. Then Black 7 forces White 8.
The result is a type of seki: Black will not dare to take the three internal white stones (White would play back at 6 to reduce the eyes to one only); but if White ever adds another inside Black would have a perfect two-eyed shape by capturing. Here Black 9 is shown for clarity only; this seki would be there anyway.
First published 11 May 2000 as On Your Side on MindZine,
Go Learning
© Charles Matthews 2000.