
In the past few weeks you seem to have found your feet at Dan's, sorting out opponents for yourself. By now you will have your own ideas about the good-natured and the bottom-feeders, those who will give useful handicap game teaching and the mere predators, conversationalists who run to wondering whether a federal Europe would mean the end of the Eurovision Song Contest, or if the opening of the Tate Modern signifies a reverse takeover of advertising by the arts, or stick to the finer points of Javascript.
It does seem though that your experience of real games is throwing up whole batches of problems. You come to me with one currently on your mind. It emerges as a theory on handicaps.
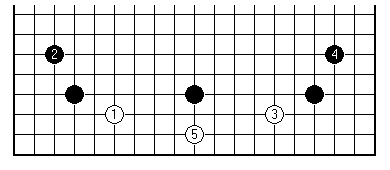
"The handicap stones on the sides are wrong. They should be on the third line."

It turns out you have been stung in this way. With the play 5 your opponent in a high-handicap game confused the issue and you went astray.
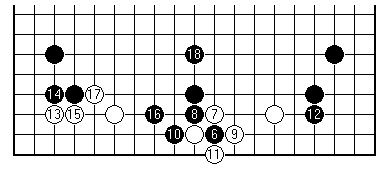
This is what happened next. It does indeed seem that you as Black ended up short-changed. In fact there are two mistakes of principle you made.
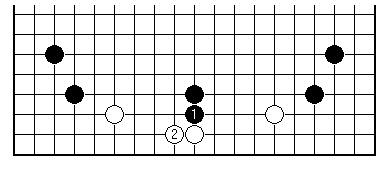
When White plays on the second line in an attempt to connect up the stones to left and right, that isn't in fact a very good play. In the trade it is known as a grovel: a low defensive play without redeeming features. We have gone over some of the ground on crawling plays. A grovel is morally halfway between a crawl and a rattlesnake's belly. So it ought to be possible for Black to take advantage. The Black play in the diagram is the stock suggestion for resolving the situation. After it White can hardly help being pinned down, to helping out one or other side.
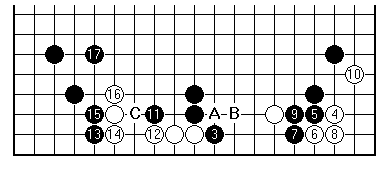
Now Black can play at 3. If White cuts at A, Black B sets up a ladder to capture the cutting stone. When White invades the corner at 4 it is important for Black to block at 5. This definitely cuts the communications between the white side and corner stones. White must continue by living in the corner area. Then Black has a chance to attack the other side of White's formation. Up to the end of the diagram Black has taken a healthy corner and built up on the side. White still has to worry about Black C; one day this may threaten the eye shape of the whole group.
Just to hammer home the point, the two basic mistakes in the way you handled matters were: using a cruder tactic to divide White's forces; and not blocking when White invaded the corner. These are both variations on the theme of keeping White weak and separated, Black's initial aim in a high-handicap game.
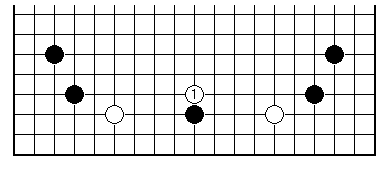
You mutter something about your games not going that way, in practice. Very well. But would you really be better off with a handicap stone on the third line? How would you deal with this play from White?
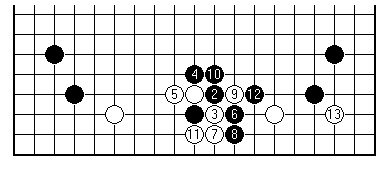
We try out a few variations such as this one. The problems involved are different. Black 2 and White 3 form a cross-cut; there is no simple way to summarise what comes next, though an important piece of proverbial advice is to extend (rather than play threats to capture). However that is nothing like a hard-and-fast rule. After a while you admit this is also tough going.
Handicap stones positioned on the fourth line are, from the point of view of strong players, in no way deficient. Since handicap games are there to teach, you should assume that use of stones placed high is one of the lessons on offer, rather than some sort of scam.
First published 18 May 2000 as On Your Side on MindZine,
Go Learning
© Charles Matthews 2000.