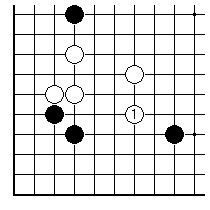

Another problem you report is with closing off territory.

"How are you supposed to block off the side, when White plays 1?"
Ah, well, I see your problem now. This looks like one corner of a handicap game on about six stones, and Black has economised on answering White in this part of the board. Now Black will pay the penalty. But there is still a right and a wrong way to do it.
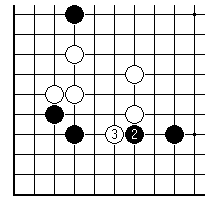
This would be the wrong way. Black 2 isn't the right idea here. It is too close to White's group. That group is strong, and if you put your weakish stones right up next to the opponent's strong stones, you can expect tactical trouble. White 3 is straightforward, but hard to answer.
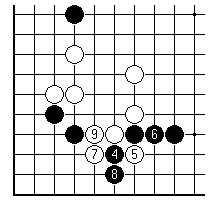
Playing Black 4 this way allows White a typical intrusion down towards the edge. Now Black is is in trouble. The two stones in the corner are hanging by a thread. Note that the role of the other white stones in the centre here is as backup: their presence means that Black cannot successfully cut White because of various short-range ladders and nets.
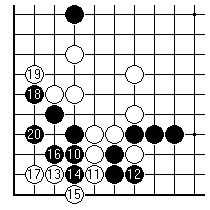
Black struggles on. The play 10 is representative of the thinking of players between about 20 kyu and 15 kyu: surely it is good to confine White in this way? Well, not really. Black could give up two stones on the right at this point; that would perhaps be wise. Saving them with 12 leaves the corner very weak. What follows is typical. Up to 17 White is having a whale of a time. These are all plays inside Black's putative territory; Black has to answer them all; and there is a real prospect of the corner dying.
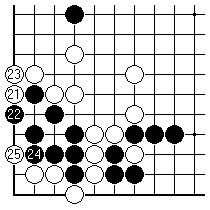
Black is angling for a ko fight on the edge, but White can avoid it with 23. Black would then be one-eyed.
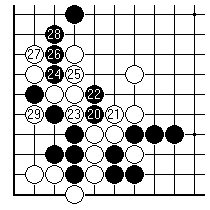
Here Black is trying to battle out to the centre. Perhaps White cannot hold onto everything? Black 24 is quite acute. But White has it all under control. This variation is "realistic" - might be seen in a game betwen players in the range of grades we were talking about. Compare with the starting position. Everything since has been a rolling disaster for Black.
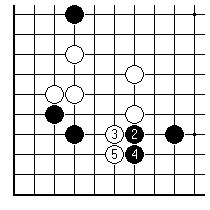
Maybe it wasn't the plan at fault, but the presentation? Going back, Black varies at 4. No, the plan is definitely trouble. Things aren't improving after White 5.
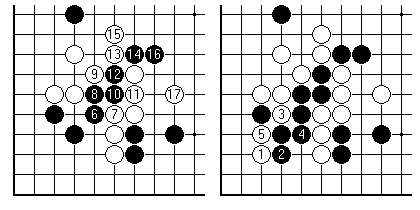
Just to deal with a tactical query: Black can't counterattack like this with any real hope of success. The side diagram shows how Black's cut in the centre leaves behind a typical case of bad shape.
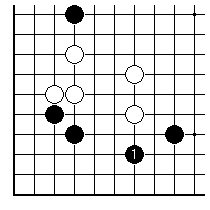
By now you should be ready to appreciate the virtues of Black's play 1 in the original position. Simply by standing one line further away from the opponent, you can give yourself a much better chance of stemming the tide of tactical threats.
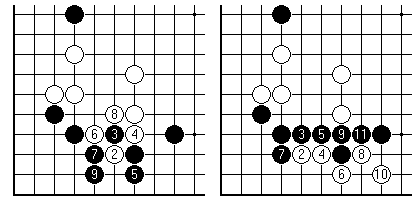
Here are a couple of reasonable variations. The point to notice is that in this case Black can be seen to be fighting on equal terms. If you play too close to strong enemy groups, you will most likely sense that straight away, because you are naturally driven onto the back foot.
First published 25 May 2000 as On Your Side on MindZine,
Go Learning
© Charles Matthews 2000.