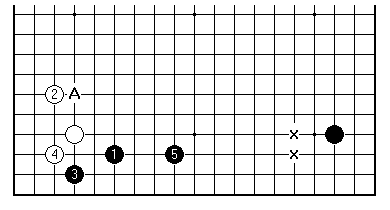

There is a formation on the side that is very natural for us to look at next. It is a close cousin of the mini-Chinese introduced in the previous article, and close in spirit also to the initial position from the first article of the series, where we came in as it were. It doesn't share the glamour currrently attached to the mini-Chinese, but has been handled by top pros, and has the great virtue for the purpose of instruction that there is one thing about it that every player should know.

This is the formation (in which 2 might be at A instead) that seems to have been introduced into top-level play by Shimamura Toshihiro (1912-1991) 9 dan in 1978. In any case he was an early adopter of this pattern, as of the Chinese style. A Nihon Ki-in stalwart, at his peak from 1955 to 1960, and who won 15 titles, he should be remembered for something in these forgetful days. His nickname was "tarnished silver" because of his low-key style of play. I suspect that in the era of consumer electronics it might have been "brushed aluminium" for unobtrusiveness.
If White does nothing here Black will soon enough enclose the right-hand corner with another play, probably on the fourth line for balance. The question that concerns us is how White might approach the right-hand corner at one of the 'x' points. Which is better?
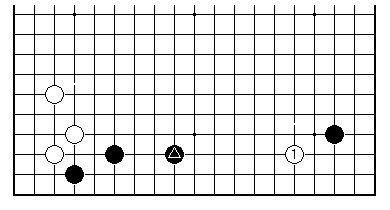
If you judge by professional games, White always approaches on the third line as here. The approach one line higher isn't seen. When such a clear-cut rule appears to hold, it is definitely worth following up. It is quite rare to have a guideline of this sort, especially one that is close to being of pure "yardstick" type - depends mostly on the seven-line separation between the marked stone and the right-hand corner.
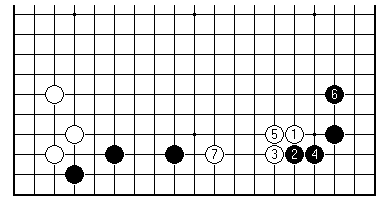
One convincing variation is this, where Black responds to the high approach with the most common opening procedure 2, 4 and 6. Then White 7 is an under-powered extension. According to a Go proverb that we'll give a thorough outing in a moment, White should extend one line further than that. Black's stones on the side are ideally placed in that sense: White's correct extension would be a contact play.
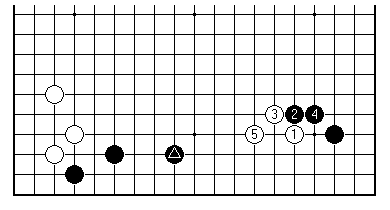
The other main variation here is Black playing 2 on the outside of White's approach stone. This corner opening becomes a trade of influence, and can continue on an ever-grander scale as both player push on up into the centre. White's problem is this context is that the marked black stone is at an ideal distance to nullify the effects of White's influence. It isn't going to come under attack because of the stable group Black has built to support it. Therefore White will be the loser in this position.
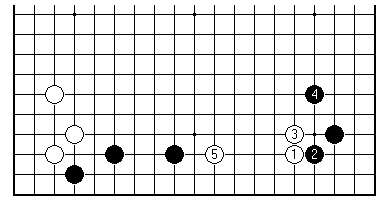
The proverb "from a two-stone wall extend three" is perfectly illustrated by one likely continuation. Here White 1 and 3 form the said wall, and White 5 is the recommended three-point extension, counting as usual the gap. This formation is considered ideal for White, considering the efficiency of stones. Certainly, if you compare it with the diagram before last, Black has less territory and White room for more (whether White can be invaded is a second-order question); and White can of course hold back 5 for security to a two-point extension and still seemingly be doing no worse.
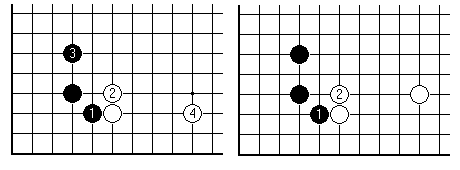
Knowing the proverb is one thing, knowing how to bring it to bear is another. Black can for example understand it as defining an ideal shape that one shouldn't give to the opponent. This will then persuade Black that the plays 1 in both of these diagrams are counter-productive, of more help to White than Black.
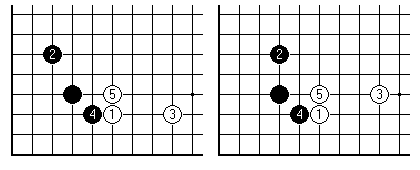
It is however rather harder to judge Black 4 in the left-hand diagram. White 3 was an idea being tried out by the world's top players around 1992-3. After White 5 it may appear that White 3 is misplaced; but the likes of Cho Chikun and Ma Xiaochun know all that. Looking at the overall position it may be that Black 4 is too much help to White, in developing this group. Certainly Black 4 in the right-hand diagram has been considered poor, in general, for a long time.

Returning to our theme, it is interesting that leading players differ on White's next play. White A has been played by Lee Chang-ho, by common consent the world's number one. B is common, and C leads to some unexpected analysis.
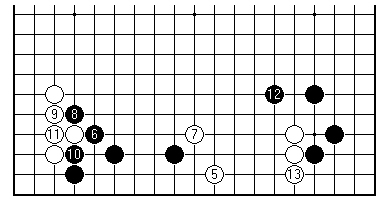
Here White's plays 5 and 13 on the second line are the personal, highly territorial Lee Chang-ho trademark. Black's groups have more developed shape, and he ended being able to take the initiative. (Black was Chang Soo-Young, the game was from the 1992 Kiseong League, Lee being 5 dan at the time).
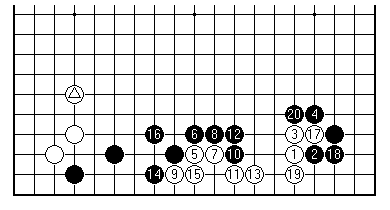
This is an early example (Honinbo League 1980) of the contact play B for White 5, played by Ishida Yoshio against Cho Chikun. The positions of Black 4 and the marked white stone were no doubt taken into account. In this case White lives on a small scale, while Black takes outside influence.
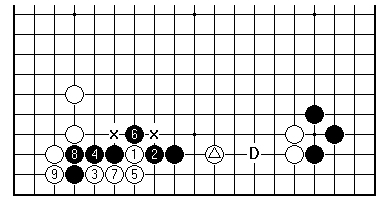
While the contact play B seems to have become the accepted way for White, dissent is heard from Fujisawa Shuko, now on the sidelines as a tournament player but highly influential as a coach. In a book he discounts the importance, after the plain extension C (marked stone), of the invasion point D. Instead he points out some deep-lying aji in Black's position. After White 1, White 3 at 7 meets Black 4 at 3, a combination known to many amateurs. But White 3 as shown is ferocious, intending to leave Black with the two cutting points marked 'x'. Black would have to tread very carefully in the fighting. Shuko argues that the marked white stone is therefore correctly placed, and that Black's invasion at D can be treated as a side issue.
[01]
[02]
[03]
[04]
[05]
[06]
[07]
[08]
[09]
[10]
[11]
[12]
[13]
[14]
[15]
[16]
[17]
[18]
[19]
[20]
[21]
[22]
[23]
[24]
[25]
[26]
First published 9 November 2000 as On Your Side on MindZine,
Go Learning
© Charles Matthews 2000.