
| Go Articles |
 | |
| Setpiece Kos |
Theme 4
Concept D
Variation 4a
Variation 4b
Variation 4c
Variation 4d
double apex ko
The corner enclosure 4-4 point plus 3-6 point is extremely common in contemporary go.
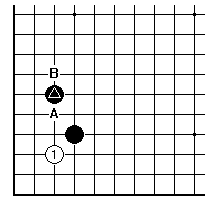
With the marked stone as enclosure, the 3-3 invasion with White 1 is expected to become ko. If it is one line lower, White should die (so that the invasion if played has some purpose other than simple life); when the black stone is one line higher at B everyone expects White to live.
This is a pleasantly simple story. If you prefer fairy-tales to real life, perhaps you shouldn't read on.
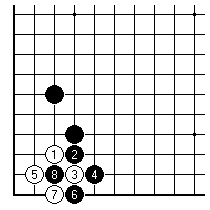
This is the standard ko after the 3-3 invasion. The main line of the invasion sequence is for this ko to be fought out, ending either with Black's capture of 7 or White's capture of 6, White's invasion then being dead or alive in the respective cases.
This ko is an example of what we're calling an apex ko. That's a special type of bulge ko, where the apex of the bulge, ie the point 1, is at the 3-3 point in a corner. The strand of middlegame joseki involving an apex ko is particularly rich, involving many examples coming from enclosures based on 4-4 and 3-4 points. A brand name is deserved.
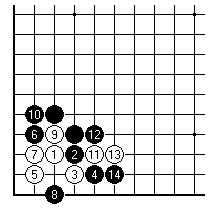
With the enclosure stone one line lower, White's attempt to make an apex ko shouldn't work. Black 6 and 8 kill the corner. If White goes to work with 9 and 11 it looks hairy for a while, but Black has the chance to capture the stone White 3. White's idea shouldn't work.
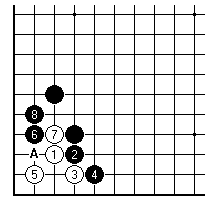
If Black tries the same idea with the knight's move enclosure, it appears that much less reasonable. Black 8 is required to prevent White A being sente, after which White lives easily. But now White can't be kept confined to the corner.
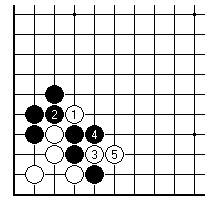
In fact White 1 is strong enough to escape, because Black 2 is unreasonable in the absence of other black stones.
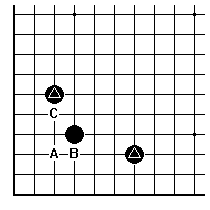
In fact if you mentally superpose that last sequence on this double enclosure, you can see that the lower marked stone is on a good point to support a determined attempt to kill the 3-3 invasion by preventing the apex ko. For that reason White's more common invasion is at B. Such double enclosures have a poor reputation. The upper enclosure stone would from a purist's point of view be better at C. They have been seen frequently in recent top-level games, being one facet of the 'Korean style'. With two knight's moves the enclosure should be safe from invasion (a celebrated reading exercise); the enclosure with two large knight's moves is called the butterfly formation, and was subject to a traditional taboo. The variations are difficult for all three shapes.
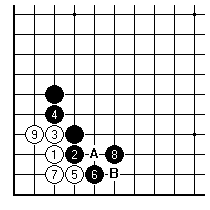
Further complications with giving a simple description of the 3-3 invasion occur because White can play 3 and 5. This dares Black to kill the corner at 9 - White would then have a choice of plays at A or B on the outside to cause trouble and unpredictable fighting. Frequently Black plays 8 to permit White to live in gote. A normal feel for the timing of the invasion 1 is based on White's wish to destroy black framework along the lower side, as well as occupying the corner. Under those circumstances Black 8 may be good as well as simple.
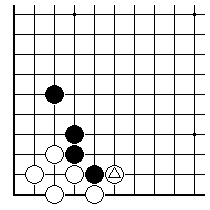
In fact let's look at post-ko positions, assuming the apex ko is fought out. When White wins and plays the marked follow-up stone, the local position is certainly good for White, considering that Black's stones are somewhat weak now. The local tally is 6-6, co-ordination is certainly on White's side - if also there has been damage to the potential of a black position to the right, White should be happy.
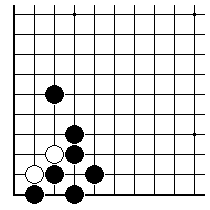
This is how it looks if Black wins. The tally is BBB.
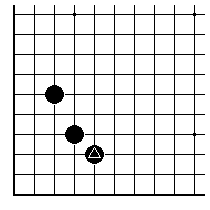
Therefore a fair comparison might be this position, in which Black has defended the corner in orthodox fashion with the marked stone. There isn't much difference in territory from the previous diagram. There is an important difference in thickness - in the post-ko position White would find it much harder to settle a weak group on the lower side. Therefore assessment of this ko must take into account the direction of play on that side. In some cases the 3-3 invasion can be worse than other options (4-3, 4-2, 5-2 are the major ones).
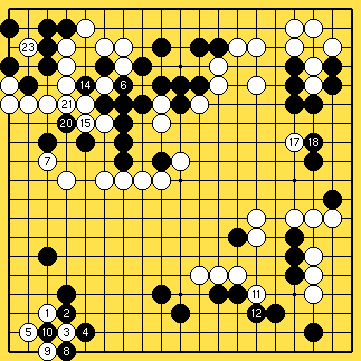
13, 16, 19, 22 capture in the ko. Black at 6: White
here being sente, Black is removing a so-called 'double
threat'. This is a required process, otherwise White
would get an threat here. Naturally Black expects an
answer - White 7 is indirect, choosing for strategic
reasons to aim at connecting, rather than just living.
White in fact is trading away some threats here. How
should Black answer 23?
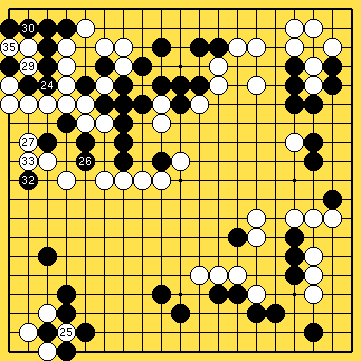
28, 31, 34 capture in the ko. Black 24 leaves two further threats here. If it were at 29, it really seems that White has only one further threat against this corner. But as played Black would take one more point of territory.
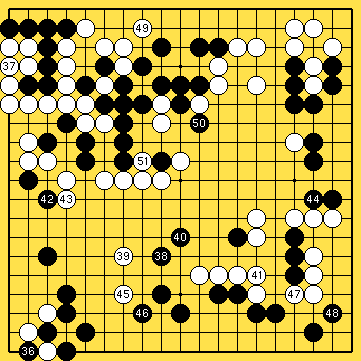
With 40 and 42 Black uses the fact that the lower left corner is thick, to take profit in other directions. The endgame now starts. Black won by 5 (no komi).
One thing should be abundantly clear from the theme discussion: these apex ko positions aren't conventional life-and-death problems. They don't come with clear-cut status answers as to success and failure of the invasions. There may be fights on the outside, of a kind the censor keeps out of problem books.
Therefore we single out the factor of outside strength as important, particularly for this family of ko positions. We'll look at variations of the one-point enclosure (ikken-jimari in Japanese). Caveat!: don't assume that these interesting sequences are the correct ones to play, to deal with any given framework based around the one-point enclosure. That's a joseki-thinking trap. Approaching on the open side is very often better than invading the corner.
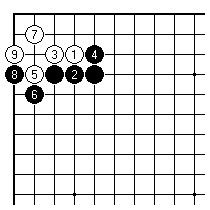
This is a very well-known sequence for White to make ko. Often White peeps with 1, as a probe, and when Black connects at 2, White waits until later to continue with 3. It is less well-known, perhaps, that starting at 3 rather than 1 is usual - and that the Go Seigen strategy just described is quite high-level. But anyway, this becomes an apex ko, without reference to outside strength questions.
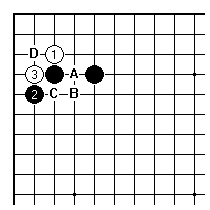
This is a variation which is different in feel, but known to the studious. Black 2 tries to make strong shape after White comes in at the 3-3 point. White 3 is hard to find. We'll look at Black A, B, in reply, which give contrasting outside strength. Black next at D allows White A, which gives White good chances unless Black is very strong locally.
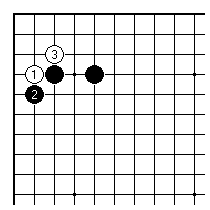
The same position arises after these more natural-looking plays.
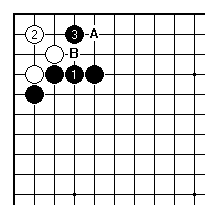
Black's first idea is to play 1 and give White a hard time in the corner. The book variation now is White A, Black B, and White extends on the top side. There are pro games with White 2, Black 3, though - Black wants to avoid the apex ko. What next?
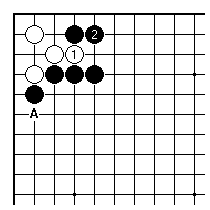
The position has become tense. White has the clamp at A to play, which is troublesome and could provoke ko. White also has the play 1, which asks Black a difficult question. Black must play at 2 to kill White, but this is a bit wild.
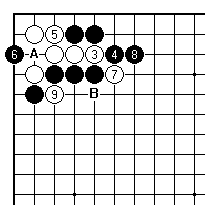
It is hard to see Black playing this way, in a serious game, to kill White outright. White 9 is sharp; if now Black A White B to squeeze. Under normal circumstances it would be better to allow White a small life in the corner.
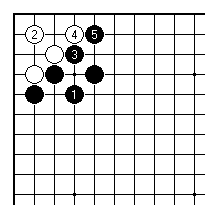
If Black makes the hanging connection at 1, the expected result is this double apex formation. Black can make ko here easily (see Variation 4a). The point is that White has created life in ko, in sente. The aji in the corner has been turned into a definite form - for better or for worse. Black cannot claim a large area here with just one more play.
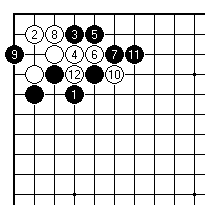
Again there is a definite problem with Black going for the kill at 3.
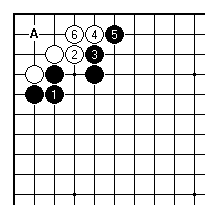
Connecting solidly at 1 may allow White life: it certainly doesn't stop an apex ko (White A, Black 6, White 2 will live or break out as before). After 2 for 3, White could make an apex ko formation at A. Playing instead at 4 apparently gives Black a killing chance at A.
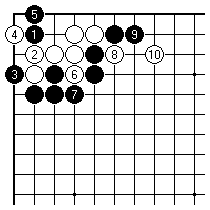
This typical sequence leads to a typical unpredictable fight (White 8 at 9 might also be good). Black's idea can easily look like an overplay. It usually makes more sense for Black to secure influence while White lives.
Naturally, though, one will see skilful handling of these issues when strong players play - anything or everything is possible between more lowly mortals.
A common way the double apex ko occurs.
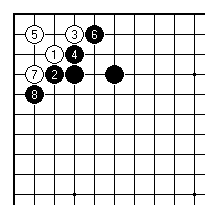
In other variations (of this 3-3 invasion of the one-point enclosure from 4-4 ) White lives, albeit in gote. Black 4 and 6 may prove attractive when the top side is more important to Black than the left.
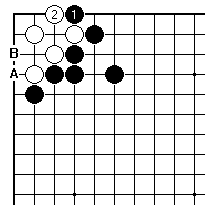
Black has two ways to start the ko, with Black 1 White 2, or Black A White B. It would seem consistent of Black to try 1 when the ko can be won, and to start at A when the ko will be lost but some other advantage gained. That's assuming the top side more important.
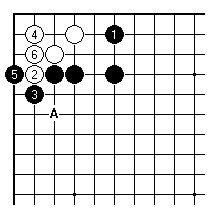
If the left side were more important to Black, one would expect this variation, in which White is alive (just, under normal circumstances), but a black stone at A would set up outside strength enough to steal the eyes of the corner.
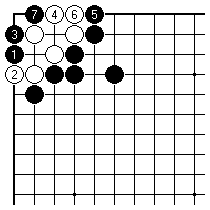
By the way, what about other attacks on the corner, such as this one? Black would suffer much less damage by initiating and then losing this ko, it seems.
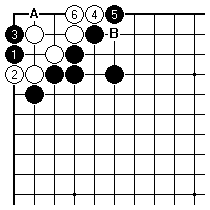
After White 4 and 6, the points A and B are perhaps miai.
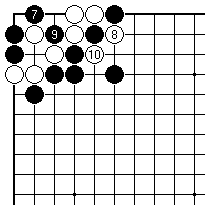
A messy variation for those who have just learned to spot snapbacks, rather than anything of much practical value for Black.
It is worth knowing about the deliberate ko variation of the 3-3 invasion (4-4 point large knight's move enclosure).
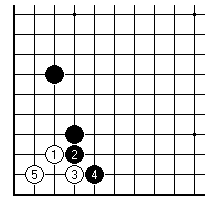
White can simply live here by pushing up from 1; but occasionally the apex technique is good.
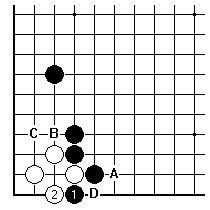
What will Black do? If Black 1, White 2 it is an apex ko, which White is presumably keen to fight. If Black B, White C White will get a double apex formation and presumably take sente. Black directly at C is very thin. If nothing at all, White will in time play at A, and then Black D is dangerous, while Black 1 White 2 is still ko.
You can probably assume that White is looking for ko here because Black has a large framework on the outside. If White wins the ko by capturing at D, and gets the follow-up point at A, this can be worthwhile in terms of the very early endgame, even taking a substantial loss elsewhere.
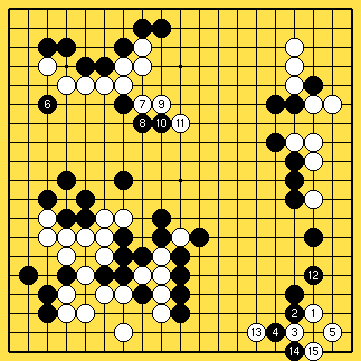
Black plays a waiting strategy, allowing White to start
the ko. Black 6 weakens White's upper group, while Black
12 sorts out Black's shape and forces the issue - after
it Black could hope to kill the corner in one play.
White 13 is perfectly natural but if White loses the ko
it will count against the tally. It does look as if both
players expected White to win.
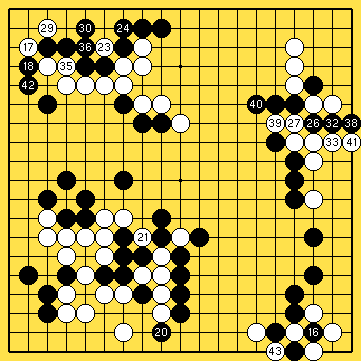
19, 22, 25, 28, 31, 34, 37 capture in ko. The threats White uses in the top left, and Black finds in the top right, lose a number of points in both cases. This is a dangerous path to tread. When White finishes the ko at 43, Black must attack the upper white group.
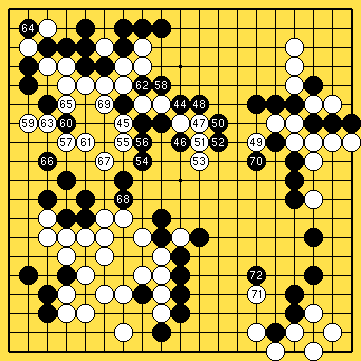
Black certainly profits by that attack, but the central
area is a little too open to become solid territory.
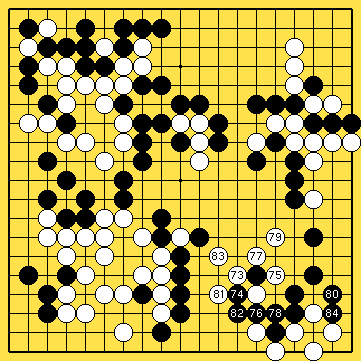
Rather astonishingly, White trades back the lower right corner for a chance to live in the central area.
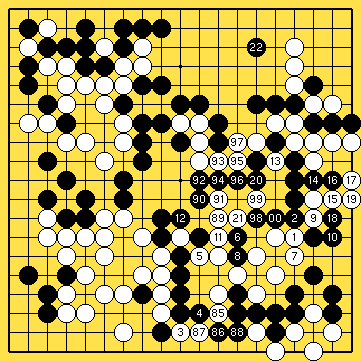
Numbering restarts (00=100, 1=101). After further fighting White pulls out one central groups and lives with the other. The endgame starts with 22. A very difficult game ended in a narrow victory for White.
There is an apex ko to avoid.
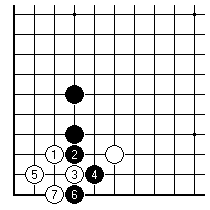
Up to 5 is joseki here, but 7 is the wrong idea - with the outside white stone in place White should just connect.
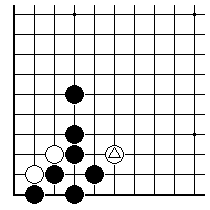
Whatever the result in the ko, the marked stone is unhappily placed. Here Black wins and it is too close to thickness.
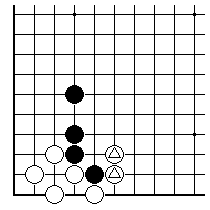
However if White wins, the extra marked stone is urgent. That adds one to the tally (becomes W rather than level 6-6). The original outside stone isn't working effectively here.
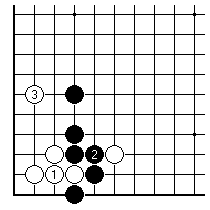
This is the honest joseki. White will play this to devastate as much as possible of a left-side framework of Black's.
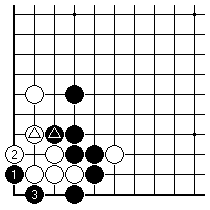
There is some well-hidden ko aji here, related to White's empty triangle. This type of sequence to make an indirect ko at the 1-2 and 2-1 point may come to life later. Just the addition of the marked stones isn't enough, naturally, to make White play 2 where it is.
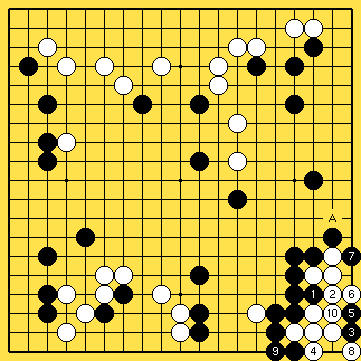
Extra moves have been added in the lower right corner. Black is still left with a weakness - a possible clamp by White at A. The sequence shown enables Black to play at 7 in sente, because after Black 9 there remains a ko in the corner. Hence White 10, and now the clamp aji has been dispelled.
There is a phantom ko in the corner, after the attach-block joseki. This is a worrying case of aji, though a pro is hardly going to fall for it. Reading required.
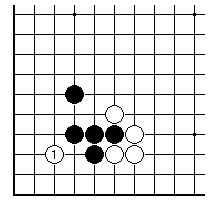
This 3-3 invasion is not so reasonable. Can Black simply kill it dead?
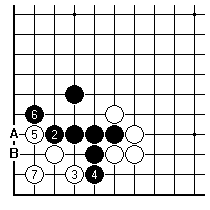
If it goes this way it's ko after Black A, White B. Black must carefully avoid this result.
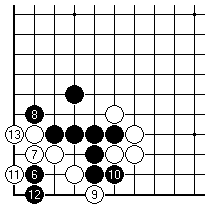
Moving Black 6 to the 2-2 point results in disappointment. The forcing move White 9 is important. Now White can live with 11 and 13.
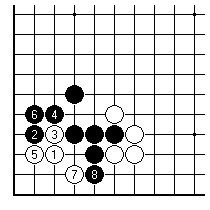
Black's initial response is suspect. In this case jumping at 2 is cleaner, removing all chance of the apex formation on this side. White 7, Black 8 is a futile exchange since the white corner group is dead as it stands.
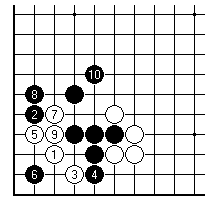
The other idea here to prevent the apex ko is the
knight's move at 2. In this case Black is just strong
enough on the outside to play the key point of 6. This
kills the corner. The previous, tighter way is be
preferred, but Black 2 here is an important type of good
shape to note.
| Posted 16 August 2002. Copyright (c) 2002 Charles Matthews | ||
| Previous edition | Index | Next edition |