
In the set-up introduced last time, the normal idea is for White to approach the right-hand corner from the outside, or open side.
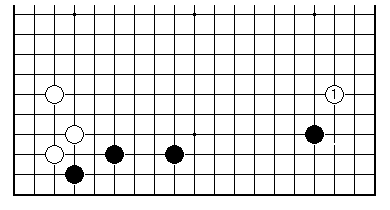
As we know, Black is forming a framework on the lower side. A conventional way of thinking about White's job is to regard the priority as limiting the framework, before anything else. The logic applies, not just here, but to a broad range of situations. Some of the reasons:

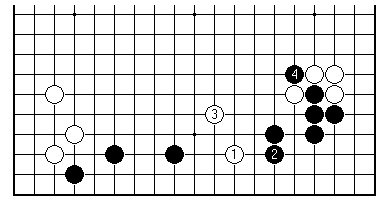
To play this way is to go to the other extreme. White's moves aren't bad at one level: they don't lack a basic shrewdness of approach. As a recipe for winning Go, however, they are strange. There is no sign of a refutation of Black's strategy. It is more like White forcing Black to play well. A rough count might give both players 15 points of definite territory on this side. But White 13 now appears as a group started in the middle of nowhere. This is a panicky response to the thought that your opponent might possibly make some side territory.
Has White had already made a mistake? By challenging Black immediately, White seems to imply that is the case. But there is no reason to believe this.
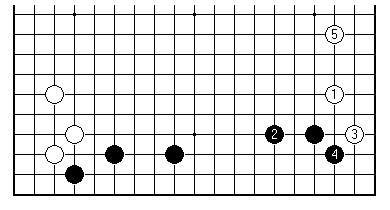
If White can get this kind of result it isn't so bad. Black's formation is quite efficient, but on the other hand it still needs one more play to become solid territory. White has influence on the left and right sides, which must be worth something in the overall position.
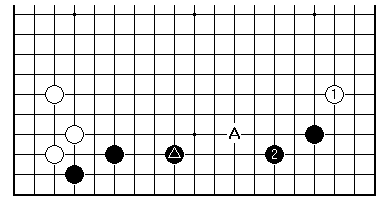
What about Black's answer? How about this way of playing Black 2? This appears to contradict one of the basic teachings about balance. However, it is in the territorial style of Ma Xiaochun, number two player in China, so beware of calling it intrinsically bad.
Since the marked black stone is on the third line, the normal idea is to play Black 2 on the fourth line, to elevate Black's position as a whole. As shown, Black might finish off the position with A, considerably later in the game, which does a kind of up-down alternation.
Let's expand on this point.
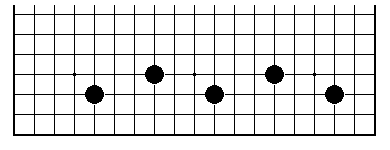
When people talk about third line/fourth line balance, they usually have in mind something like this sort of M-shaped formation. If all the black stones were on the third line, that would be unambitious in terms of territory, and also "low" (lacking in central influence). However if they were all on the fourth line, the territory would be relatively insecure.
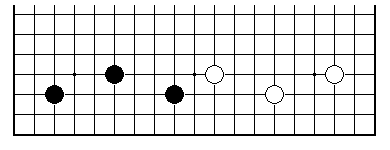
For smaller-scale formations, the inverted V or "tent" (three black stones on the left) tends to work better than the V (white stones on the right), which may suffer erosion of territory at the less well-anchored ends.
However, these basic patterns do undergo modification according to context, and don't by any means exhaust the subject. Here are a couple of further sample positions to try to clarify the balance concept.
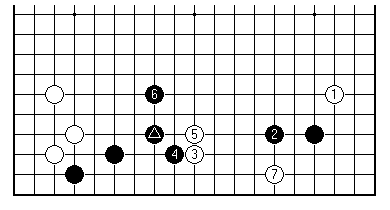
In this case Black has varied by placing the marked stone on the fourth line. Now it appears that Black 2 on the fourth line is possibly unbalanced (too loose). White can come in at 3, and up to 7 sets Black's right-hand group floating. Black 2 on the third line would be in fine attacking focus, in this case.
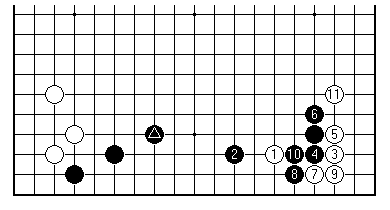
If on the other hand White approaches the corner this way, the marked black stone can end up looking better balanced than it would on the third line.
But in our case Black's left-hand formation is on the low side.
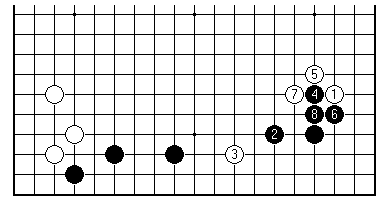
Therefore Black 2, on the fourth line, is in order. It is quite true that White could invade immediately at 3. If Black reacts passively then White may have a chance to weaken the right-hand corner. Black 4 and 6, the attach-block pattern, are a positive manoeuvre. White is going to be very busy in the near future, trying to hold things together. Neither of Black's groups should get into trouble.
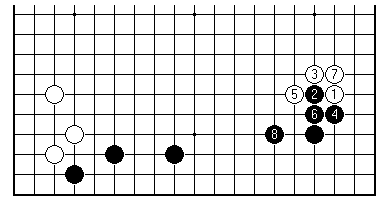
In fact it has often been seen in professional play, for Black to play attach-block immediately White approaches from the outside. There are other choices for 7; but Black 8 is always the key point of Black's shape. This way of thinking by Black is theoretically sound, both as far as strengthening the framework on its edges goes, and for the feeling of balance along the lower side.
This sort of early fight promises Black plenty of chance to gain the initiative.
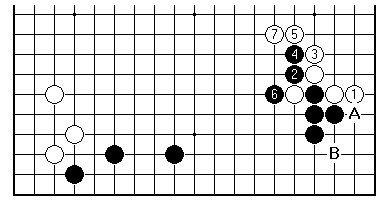
This variation developed by top Korean players shows a White effort to keep matters more fluid across the lower side. White A, Black B is White's prerogative here (Black shouldn't block directly and allow White to peep at B).
[01]
[02]
[03]
[04]
[05]
[06]
[07]
[08]
[09]
[10]
[11]
[12]
[13]
[14]
[15]
[16]
[17]
[18]
[19]
[20]
[21]
[22]
[23]
[24]
[25]
[26]
First published 5 October 2000 as On Your Side on MindZine,
Go Learning
© Charles Matthews 2000.