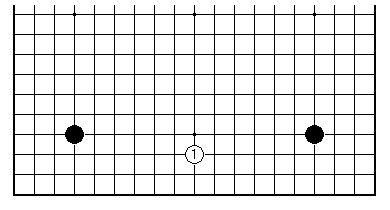

With the ever-greater use of 4-4 points in the opening, it is a most natural question "how do you play against two on a side?" The Two Stars (Japanese nirensei) formation with 4-4 points in adjacent corners has, since the 1980s, become popular with White as well as Black.

The wedge play by White, symmetrically placed between the corners, is a fundamental idea. (There are other possible wedges one to the left and right, in line with what was said in the previous article, the separation between the black stones being eleven lines.) Despite this having been a common play for at least 65 years in professional Go, the resulting variations are by no means all worked out, and just a taster can be given here.
It isn't necessarily wrong for White to approach either corner instead, but there is plenty to be learned from this, the modern wedge as we shall style it. In fact from a strategic point of view this is a most deceptive situation.
As everyone should know, the 4-4 point can be invaded at the 3-3 point - but if White does this prematurely Black will build early influence for a good result along the side. The wedge play 1 guarantees White a group on the side with a base, which would be well placed to neutralise that Black influence if White later got round to either 3-3 invasion. So far, so good.
The potential of the two 3-3 invasions will then hang around in the game for a while. How long? There's the rub. We get here a sniff of the Japanese concept of aji. Literally "taste" or possibly "smell", think "aftertaste" as in "lingering", or "air freshener" as in "old cigarette smoke in your curtains". Because we start in a symmetrical position you may think you can get away with the restricted version of the aji concept explained as "thinking of the two 3-3 invasions as miai". That is, White reasons that Black can't defend both corners with a single play, so says, "no hurry, I get established on the side, you defend one, I invade the other". The problem is that, as soon as we get further action on this side, it becomes considerably harder to see this as a real mechanism. So, it's a half-truth, part of the picture with aji. The full-blown aji concept takes quite some digestion. (To give it in summary, you need to take on board two main points: (a) aji relates not just to potential to invade or live, but for example potential to cut, or any other tactical element such as breaking a ladder or making a ko threat; and (b) in high-flown language, aji is part of modality-handling, namely a prospectus of possibilities, and by the nature of Go is the major partner, forcing plays (kikashi in Japanese), or prospectus of necessities, being normally auxiliary. Well, you did ask.)
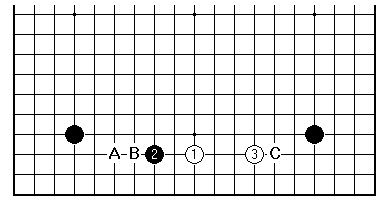
Next, what? - we clearly need some concrete variations to get our teeth into after that excursion into blue-sky theorising. Something like this diagram, supposing Black plays here first (the urgency of first play here will be less than for some other typical opening plays). Black pushes from a chosen side with 2 (maybe B, conceivably A) and White extends to 3 (traditional) or C (modernistic).
Black's choice amongst A, B or 2 requires the taking of a view. While A defends the corner best (now the usual invasion at 3-3 for White expects a ko only for life), anyone can see that is at a cost of less pressure on White 1. Play B strikes a balance, and 2 has the most punch, while regarding the left-hand corner aji as secondary for the moment. Well, Black also wants to do something to shore up the other corner, so turning the screws on White may manage that in an "attack the best form of defence" way.
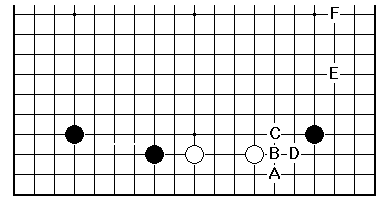
If we get therefore to this position, Black might continue with any of A to F. Of these A, B and C try directly for corner territory; White will get settled and look towards the open left-hand corner. Black D and E are the main line choices, and the provocative F was seen a while ago in pro games (if White invades at or near E, Black C is a good fighting shape).
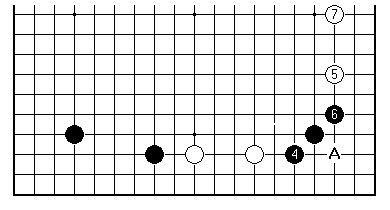
This is the old main variation. There is corner aji left at A, still; so there was dissatisfaction in the ranks (not, I think, that you could get all 9 dans to agree; Fujisawa Shuko seems to like 4).
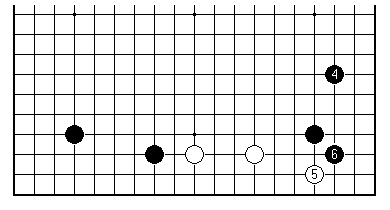
So now Cho Hun-hyun, the brilliantly lucid Korean number 2 (displaced only by his pupil Lee Chang-ho), comes down in favour of 4 played this way. If 5 and 6 happen Black has efficient shape (and White can still be invaded on the lower side at some stage). Black has too the option of playing elsewhere with 6, in line with Cho's rapidly developing style.
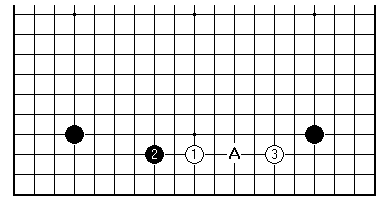
The other way to play, stretching the white extension to 3, has become the standard idea in recent years. What White is doing here is creating further aji in the position, namely allowing Black to invade at A. What with two open corners already, this is a dynamic situation and you shouldn't be surprised that the variations aren't completely explored.
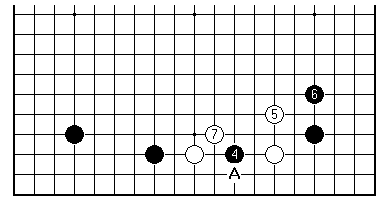
Nowadays this sort of thing is the most frequent development. Black accepts the challenge and plunges in at 4 immediately. White surrounds Black with 5 and 7. The major branch would be White 5 at A, which is a sacrificial tactic to get White connected either along the second or fourth line, leading to acceptable results.
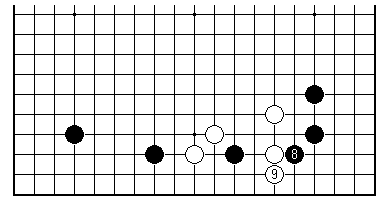
Black now could force with 8, doing quite a lot for corner safety but not completely cleaning up the problem.
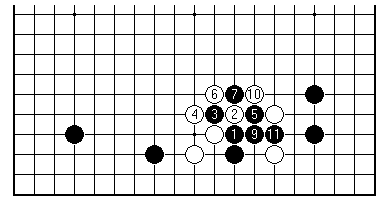
A reason for Black to hesitate before doing that is the fact that the single black stone isn't really dead yet. Yes, you guessed, it has aji. If you don't respect your own good aji - lurking possibilities - you are going to botch many positions. There is this ko-related sequence (White 8 at 3 assumes White backs down from cutting and fighting the ko). And doubtless plenty more where that came from. Black has to bear this all in mind before doing anything round the edges of White's position.
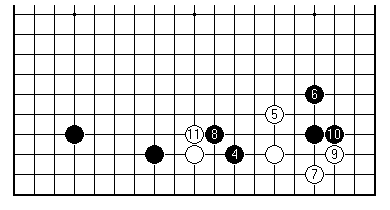
If White tries to get the jump on Black by putting in 7 as a slide into the corner, that opens a whole new can of worms. There is no real reason for Black to submit with 8 at the 3-3 point 9. Therefore there are fighting variations, set off by what is effectively cheek on White's part. As shown here White has some corner profit, and the other white group will move out into the centre in parallel with Black 4 and 8.
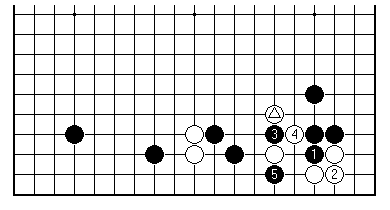
I'd like to finish by pointing out one of many things that goes on in this sort of position. As a trade-off for allowing White the 3-3 point in the right corner, there is the shape feeling that the marked white stone is misplaced. This becomes visible once Black has played 1 for 2. There is a quite well masked combination cut with 3 and 5, which has to be taken into account in the later fighting. So, an extra piece of aji.
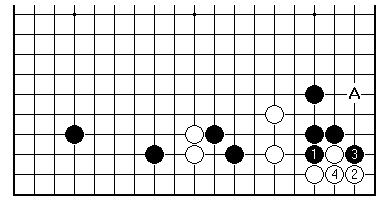
Should therefore White plan to answer Black 1 with 2 as here instead? That would leave the corner with more eye shape, assuming the worst came to the worst and it was cut off later. Well, tell me whether the aji of a White play at A later is a big deal, and I'll try to give you a straight answer ... after Black 3 is exchanged for White 4 this is a less serious invasion point. The forcing play 3 interacts with the aji on the right side. And yes, if you don't find this complex you don't understand what's going on.
[01]
[02]
[03]
[04]
[05]
[06]
[07]
[08]
[09]
[10]
[11]
[12]
[13]
[14]
[15]
[16]
[17]
[18]
[19]
[20]
[21]
[22]
[23]
[24]
[25]
[26]
First published 26 October 2000 as On Your Side on MindZine,
Go Learning
© Charles Matthews 2000.