
One of the main branches of the Three Stars (sanrensei in Japanese) opening leads to a side position that is a variant on the Anti-Kobayashi pattern that has been under study.
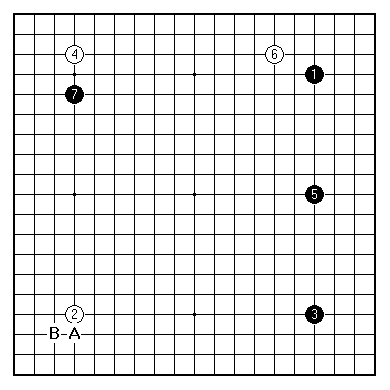
This position has been reached often in professional play. The top side is the same as in the two previous articles in the series, with the superficial change of the reverse of colours, and the addition of the stone 5 at the star point on the side. This extra stone doesn't directly obstruct any of the normal plans for White, but must be taken into account in evaluating them.
The same formation at the top is also seen with the white stone lower left at A or B. If White is found facing the Three Stars with a position based on a 4-3 point, it is almost certain to belong to this family. Black rarely plays the Three Stars against a 3-4 point, the other orientation, the reasons being quite similar to those underlying the Anti-Chinese.
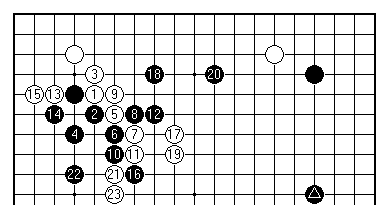
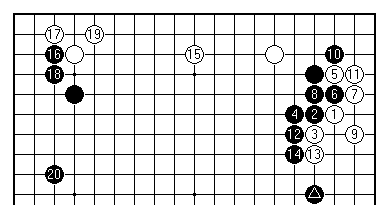
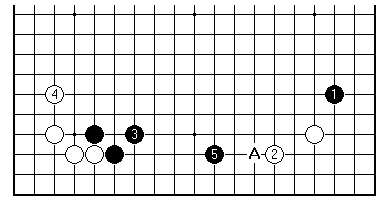
This example is from Rin Kaiho-Ryu Shikun in the 1998 Meijin League. Central to pro thinking about Go in general is that a stone like the marked black one must not lie idle awaiting developments. Black must actively seek to create positions in which it is clearly well placed. In this case Black varies with 12 from the peaceable variation seen before after White's outside contact play 1. Black must suffer some loss on the left side, but the general aim is to have the centre swarming early with weak groups.
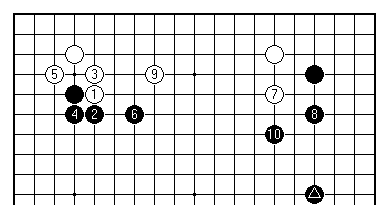
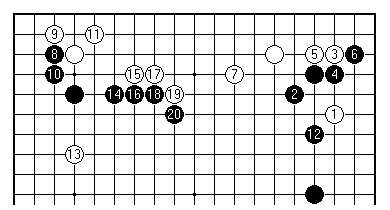
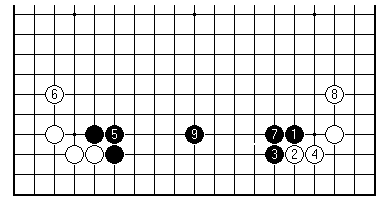
As played by Takemiya, the modern master of the Three Stars, the meaning of Black's marked stone can be read quite differently. Black develops into the centre on firm foundations, apparently without concern about White's framework on the top side. This is from Takemiya Masaki-Awaji Shuzo in the 1988 Oza final, game 2.
In what followed White played 3 on the lower side of the board. Black created great influence with 14, but gave up the initiative once more to do so. Black won this game by killing a white group on the right side, a fighting justification of his strategy.
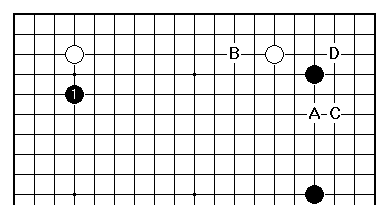
Looking more closely at Black 1 here, it fits with Takemiya's conception of Go (the famous 'cosmic' style, though he himself calls it 'natural'). In fact it seems as if this approach play, ignoring for a moment the top right, may have been an invention of Kato Masao; it occurs in a game of his against Ohira in the 1973 Nihon Ki-in Championship. Black's normal plays in the top right would be at A or B. White can continue in the top right with the double approach C or the invasion D.
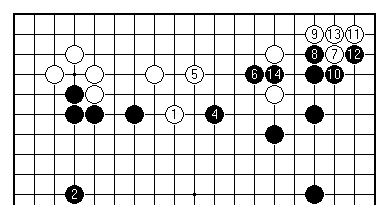
This occurred in Takemiya's game against Sakakibara Shoji from the Gosei tournament in 1984. Shortly Black took the point A, and the stage was set for Black to colonise the centre. In cosmic Go certain concessions such as Black 2 are made - earning the epithet 'slack' - but the real test of the plan comes later as the central framework is poked, punched and punctured in the fighting.
One article of faith for the followers of cosmic Go is that Black has no reason to fear the double approach 1 here, in the Three Stars context. This seems to be so generally accepted, that examples are thin on the ground. This is from Cheong Su-hyeon 7 dan versus Paek Seong-ho 8 dan in the Korean Wangwi League from 1992. This time Black's marked stone ends up on a key point for shape.
This Chinese game from 1988 shows the diagonal answer Black 2, normally considered one of the hallmarks of the cosmic style - but, as the true believers explain, these matters cannot be boiled down to a routine.

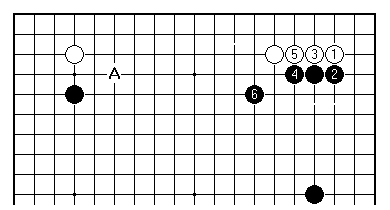
All in all, White's inside contact play 1 here is a good choice in this position. White tries to settle in one place, first of all. Black's wish to sweep the game forward into early combats will be resisted. Black could in fact commit to the avalanche opening, instead of playing 2 as here, to stoke up the fighting, as in the Kato-Ohira game mentioned before.
Another way for Black to keep up momentum is to leave the upper left for a minute. This diagram representing the left side of the board, Black can transfer to the lower left corner with the approach 1. Now fighting may well break out if White refuses to be pushed around; but assuming White 2, Black can return to 3 and 5. From the point of view of invading Black's formation later, White 2 ought to be at A. This is certainly a dynamic plan for Black, and one that involves only ordinary plays.
Assuming a white stone at 4-3 in the lower left instead, this is a classic sequence. This has actually occurred from our starting position (a Korean game Kim Il-hwan against Pak Yeong-ch'an from 1992, which White won); it is much better known in the Two Stars opening. White's strong stones 6 and 8 restrict the expansion of Black's framework.
[01]
[02]
[03]
[04]
[05]
[06]
[07]
[08]
[09]
[10]
[11]
[12]
[13]
[14]
[15]
[16]
[17]
[18]
[19]
[20]
[21]
[22]
[23]
[24]
[25]
[26]
First published 8 March 2001 as On Your Side on MindZine,
Go Learning
© Charles Matthews 2000.