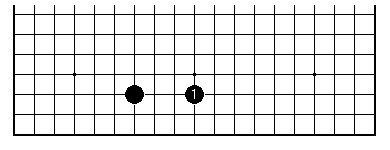

The basic unit that gives the correct feeling of scale to the sides of a Go board is the two-point extension, played on the third line.

Here "two-point" refers to the two-line gap between the black stones. Extending in this way is the common way to build a group on the side that has a base (some amount of eye space). There are plenty of other standard extensions, which may involve plays on the second and fourth lines too. But the two-point extension is unrivalled for steadiness.
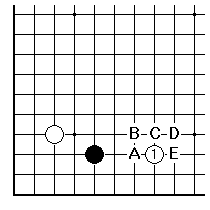
The first use we'll show of the use of the two-point extension as a yardstick is to clarify the pincer concept. White 1 here deprives Black of the two-point extension. It, together with any of the adjacent plays A to E, is a pincer play against the black stone. If White plays one of A to E, and Black responds anyway at 1, a local contact fight breaks out (in case of A, C and E Black is playing in contact, in cases B and D as an angle play but then White will add A to B or E to D). These fights are going to be unfavourable to Black in the opening, for reasons we'll see in a moment.
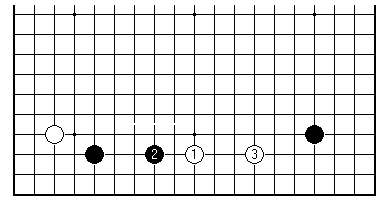
If however White puts safety first and plays White 1 as shown, four lines away from Black, that doesn't constitute a pincer. Black and White both make two-point extensions. Now Black can turn to the left side.
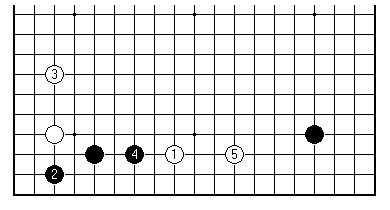
A pincer play can be considered to involve some
strategic risk. What are the potential benefits?
If Black plays passively White may get this kind of
result. Judged in terms of territory Black's group in
the left corner and the two white groups are in balance.
But White has done much better when you look at overall
position. For example, White's group on the lower side
is well placed to impede Black's plans for the right
corner 4-4 point.
It is axiomatic that developing on both sides is an advantage. Corner openings often lead to one player having two side groups, that aren't as stable as these; in that case the trade for the corner territory may be judged fair. But two well-established side groups will be worth more than a smallish corner.
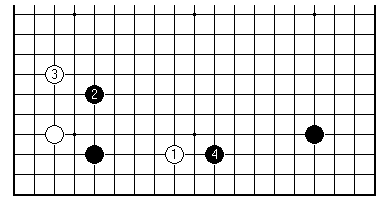
This would be the recognised way for Black to handle the side, with the white pincer becoming weak. If this result is fair, it is easy to recognise how much White gains in the previous diagram.
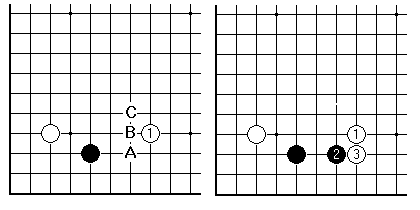
Going back now to contact fights that Black may initiate after a pincer, how about Black A, B or C? In fact Black A is bad. In line with what was just discussed, the reason can be seen this way: the pincer stone White 1 is a potential target for attack. The logic of attack and defence in Go is that contact fights are the resource of the defender, to gain some strength. Therefore the attacker should steer clear of them.
Of the other plays, Black at B is a marginal idea, researched by professionals in the 1950s. Black at C is the pick of the bunch (though it may lead to some complex variations). With it Black heads for the centre one line ahead of White. If both players push up, it should be the case that Black will have first chance to play on the left side, to attack White's corner stone.
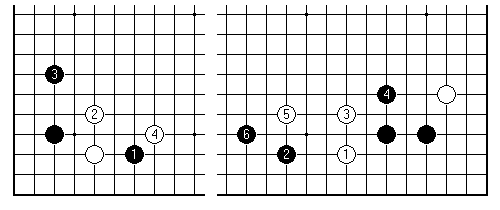
The two-point spacing also distinguishes the close pincers from the restrained ones. In the left-hand diagram Black 1 is the most forceful pincer, but after 2 and 3 the counterattack White 4 is good. The right-hand diagram shows the two-point pincer Black 2, with which Black can handle both sides in a relaxed fashion. Here the one-point pincer can lead to trouble.
Combining the wish to develop with a two-point extension on the side, and the miai concept introduced in the previous article, one comes to the wedge.
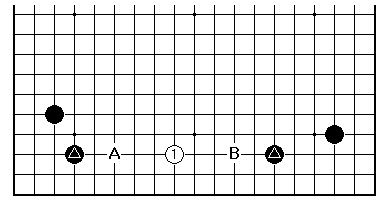
There are nine clear lines between the marked black stones. This is the minimum spacing for a White play such as 1. White 1 counts as a wedge because it sets up the miai of plays next at A or B. Since Black is strong in this part of the board White can be happy simply to build a group with a base, while preventing Black's complete occupation of the side.
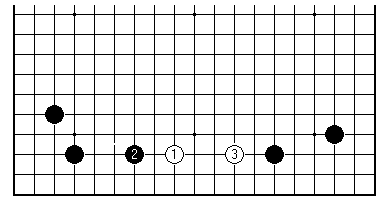
When Black plays 2, White 3 becomes a very urgent play. After that Black may attack White's group from various directions, but White should be able to defend without undue difficulty.
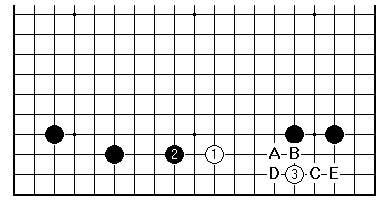
Where there are fewer than nine lines to work with, the wedge may still be possible, but as a more complex tactic. The working assumption is that contact fights are best avoided, if possible. In this case there are eight free lines. White 1 sets up miai of a two-point extension to the left, and the slide to 3. There are now a number of ways Black could try to take advantage, since White's position is "thin", a trifle over-stretched. White with skilful play ought to be able to weather the storm. Another possible sequence replaces 3 by the angle play at A. After Black B, White 3, Black C it would be time for White to jump out from 1 into the centre. Later White would take interest in connecting at D, to stabilise the group, and leave interesting potential for a follow-up at E.
When there are ten or more free lines, you have the luxury of choosing between more than one possible wedge play in that space. The wedge is an essential tool to deal with broad frameworks, in playing on the sides.
[01]
[02]
[03]
[04]
[05]
[06]
[07]
[08]
[09]
[10]
[11]
[12]
[13]
[14]
[15]
[16]
[17]
[18]
[19]
[20]
[21]
[22]
[23]
[24]
[25]
[26]
First published 19 October 2000 as On Your Side on MindZine,
Go Learning
© Charles Matthews 2000.