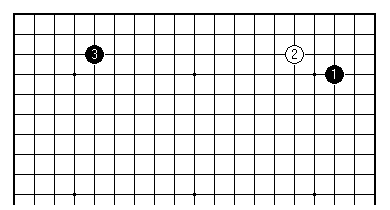

In the old days many games started like this:

What is going on here? In those times there was no komi to compensate White for playing second. The immediate approach 2 is one way to complicate the game into something more tense than a share-out of territory. But Black 3 on a 5-3 point has a special, explicable meaning.
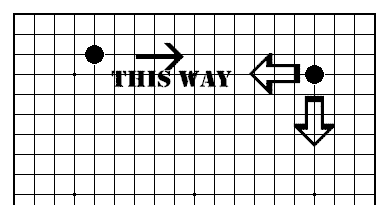
A 5-3 point exerts influence, to be sure. As used by Go players, the term 'influence' is so broad as to be in danger of meaning just about any effect that isn't purely to do with secure territory. There is a difference if we compare with a 4-4 point, which also of course is a play for influence. As suggested by the diagram, the 5-3 point comes with a preferred direction, along the side, while the 4-4 point acts equally in two directions.
There is also a difference in quality, when it comes to fighting. The 4-4 point works best when the opponent builds a weak group at about the distance suggested by the points of the arrows. The 5-3 point prepares for all-out fighting anywhere along the side - its position on the third line means it isn't quickly undermined, as a fourth line position may easily be.
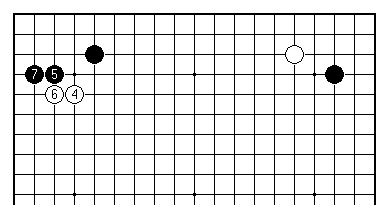
In classical Go of the Edo period in Japan, White most often approached at 4, allowing Black to take territory with 5. There is a story behind this play.
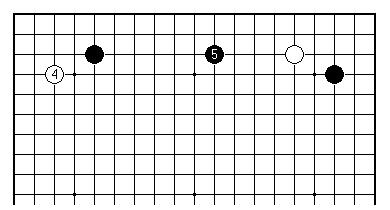
The assumption was that if White approaches in the more conventional way with 4, Black 5 is an ideal combination of pincer on the white stone to the right, and extension from the black stone to the left. This teaching was believed to the extent of creating a taboo. And in fact it is still held to be an important insight.

For example, if Black and White play 3-4 points in this way with 1 and 2, the side is likely to be played out almost instantly (because first play here is urgent, in other words this is a 'hot' area); and after Black 3 White normally avoids symmetry by choosing 4 rather than the approach on the third line.
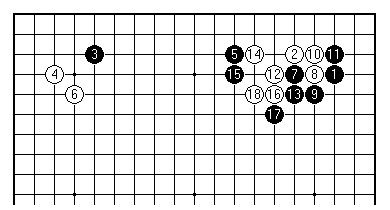
What has been said so far is conventional doctrine, supporting the play Black 3 as a logical plan (though it is far from the only one). Since this follows on from material in Chapter 9 of my Teach Yourself Go, I was interested to find a number of examples where the underlying symmetric pattern was tested in professional play, nearly all in games of Kitani Minoru. Here in 1926 (aged 17 and 2 dan) he had Black against the highly aggressive Shinohara 'Heavy Tank' Misami 3 dan.
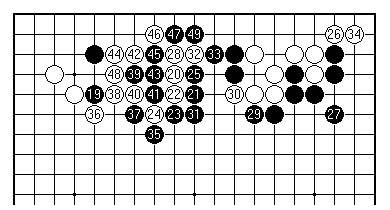
In what followed White invaded Black's framework, but changed horses in midstream, setting up instead one of those trades beloved of professionals. The point to notice is that Black's influence in this game underwent a transformation, ending up pointing south where it started pointing due east. Nothing could be more characteristic of fighting.
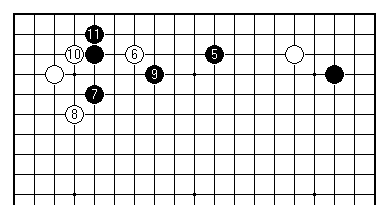
A year later Kitani tried this strategy himself when taking White against the higher-ranked Hayashi Yutaro. Up to 11 it looks like White is playing for a quick fix here.
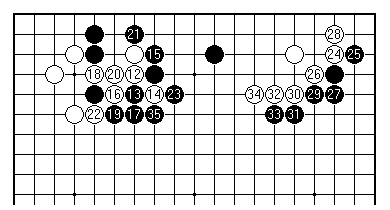
The end result is comparable to the previous game, in general terms, if reached by a quite different route. Black 35 is professional play, dismantling the ladder before it causes complications.
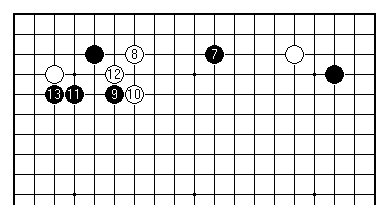
In 1931 the imaginative Kubomatsu Katsukiyo played this pattern on Go Seigen (Black), after a couple of plays that occupied the lower corners first. Black dodges away from White with 9, 11 and 13.
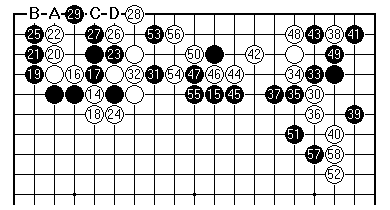
For a while the whole side becomes a fighting area. Assessment of the end position is complicated by the sinister ko left behind (White A, Black B, White C, Black D), meaning also that Black 53 was far from a waste of time. (If White starts and loses the ko, the stones 53 and 31 will cut White, as you should check.)
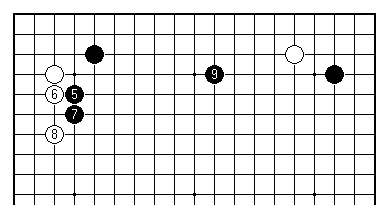
In 1941 Kitani tried this plan again in the Oteai, on Sekiyama Riichi (Black), who later in the year became the first victor in a Honinbo title match. Black 5 and 9 show another option for putting the 5-3 point to work: first press and only then play the pincer-cum-extension. At the time Black 9 was an unexplored play.
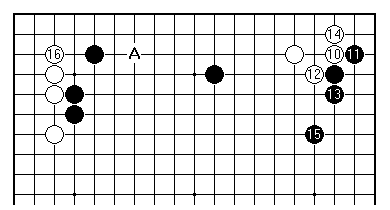
White's approach is sober enough, reflecting the older, deep-thinking Kitani. White 16 is a slow play at a key point, setting up an invasion at A (which happened as soon as Black took an empty corner). Black won the game by a small margin.
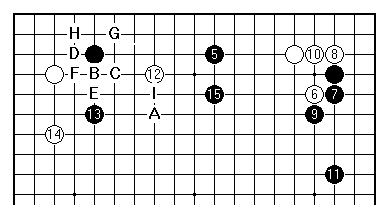
Kitani, nothing if not a stubborn individualist, returned once more to play the same way against Segoe Kensaku in 1945 (both players then 8 dan). With the formation later fixed by the sequence Black A, White B through to Black I, Kitani was giving rein to his acquired taste for territory; losing however this game too, by resignation.
One can therefore say that the merits or otherwise of symmetrical play by White in the initial position were tested by top players in the second quarter of the twentieth century. As far as I can tell the taboo hasn't been that much dented, making Black 3 of the initial diagram still quite an effective answer to White 2.
[01]
[02]
[03]
[04]
[05]
[06]
[07]
[08]
[09]
[10]
[11]
[12]
[13]
[14]
[15]
[16]
[17]
[18]
[19]
[20]
[21]
[22]
[23]
[24]
[25]
[26]
First published 22 March 2001 as On Your Side on MindZine,
Go Learning
© Charles Matthews 2000.